
Javascript
Custom world with Google Maps
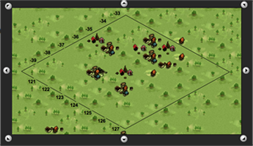 Torpia map
For some of you may know I am working on a game called Torpia. It has great graphics and drawings. I like the way the game is handled, but once in a while there are some things that bug me. And like any other developer I want to do something about it.
The idea
In Torpia there is a page that shows you a map. It is a part of the total map and it shows villages of the players in the area you are looking at. You can easily navigate to another part of the map by clicking through the arrows next to the map. At first I thought really easy, right? Over time this becomes a painstaking process.
Because of this paintstaking process I suggested a Google Maps implementation. In the past I had seen some awesome implementations with custom maps.
After searching those examples again I was wondering: "Is it hard implementing our own maps?". Yes and no. The easy part is the code. The hard part is creating the map. In this article I will only cover the code that's needed. Constructing and plotting the map will be described in an upcoming article.
As I said before setting up the code for Google Maps is easy. Here are the steps:
- Sign up for a Google Maps Key
- Create an example page to start with
- Alter the Javascript to point to the right server to get the right tile.
1. Sign up for a Google Maps Key.
Go to the Google Maps site and you can sign up to get a key for your specific domain. They have extensive documentation which I won't explain over here.
2. Create an example page to start from
When having signed up, you get some example code that you can use. Upload this to your domain and check the example page in your browser. You can also get code below and replace ###YOURKEY### with the key Google gave you.
Example:
<!DOCTYPE html PUBLIC "-//W3C//DTD XHTML 1.0 Strict//EN"
"http://www.w3.org/TR/xhtml1/DTD/xhtml1-strict.dtd">
<html xmlns="http://www.w3.org/1999/xhtml" xmlns:v="urn:schemas-microsoft-com:vml">
<head>
<meta http-equiv="content-type" content="text/html; charset=utf-8" />
<title>Google Maps JavaScript API Example: Simple Map</title>
<script src="http://maps.google.com/maps?file=api&v=2& 
sensor=false&key=###YOURKEY###" type="text/javascript"></script>
<script type="text/javascript">
function initialize() {
if (GBrowserIsCompatible()) {
var map = new GMap2(document.getElementById("map_canvas"));
map.setCenter(new GLatLng(37.4419, -122.1419), 13);
}
}
</script>
</head>
<body onload="initialize()" onunload="GUnload()">
<div id="map_canvas" style="width: 500px; height: 300px"></div>
</body>
</html>
3. Alter the Javascript to point to the right server to get the right tiles
For this I had to cheat. The only thing that I wanted to see is if custom maps were possible. So I created one single PHP file that will always display the same image when called in the browser. I use this file as gateway to my other images that will be stored on our server in the future. I haven't gotten those yet, so one image will suffice. After the file was created and the map displayed one image, I began modifying the JavaScript to point to this gateway-file. Below I marked the changes bold in our script.
function initialize() {
  if (GBrowserIsCompatible()) {

      var copyCollection = new GCopyrightCollection('webgamic');
      var copyright = new GCopyright(1, new GLatLngBounds(new GLatLng(-10, -10),
						  new GLatLng(10, 10)), 0, "©2008 torpia.com");
      copyCollection.addCopyright(copyright);

      var tilelayers = [new GTileLayer(copyCollection, 3, 11)];
      tilelayers[0].getTileUrl = CustomGetTileUrl;

      var custommap = new GMapType(tilelayers, new GMercatorProjection(12),
						  "Chart", {errorMessage:"No chart data available"});

   var map = new GMap2(document.getElementById("map_canvas"));

   map.addMapType(custommap);
   map.setCenter(new GLatLng(70.9883492241249,-77.783203125), 11, custommap);
  }
}

function CustomGetTileUrl(a,b) {
    return "http://yourdomain/tiles/tile_"+a.x+"_"+a.y+"_"+(17-b)+".jpg";
}
The most important is thing we added is the CustomGetTileUrl method. As you see it gets tiles from "yourdomain" with special coordinates and a zoom level. The image name looks something like "http://yourdomain/tiles/tile_1450_3582_11.jpg". For testing purposes you could also set just one hardcoded link to an image like "http://yourdomain/tiles/tile.jpg". With a simple mod-rewrite I had it pointed to the PHP file that dynamically gets the right Google Maps tile. Later on I'll be able to do whatever I want with the information given in the image name. If you try and refresh your browser with the given modifications you see that you have your own custom map: ta-da!
The Map
The Map is a tricky part and I haven't covered everything yet. I will describe how to create a dynamic or static map in an upcoming topic. For the people who can't wait for this next article, below are some resources for creating custom maps.